So I backed Pebble Time ($179 slot) but today morning in the train I read on Facebook that some people had managed to switch to the lower $159 bracket due to drop outs.
Since I could not keep refreshing the page, I wrote a script to help me check for vacancy. It is hosted here:
https://github.com/Ashwani001/kickstarter-scripts/blob/master/kick-checker.py
Missed a few chances but managed to change on the 4th or 5th chance. Saved myself about SGD30 and it was the first time I wrote a mining(? not sure what to call this) script for application.
Ok so the how to, for non coders:
(1) Download the file (kick-checker.py)
(2) Open a terminal (command promt)
(3) Navigate to the file
(4) type 'python kick-checker.py'
(5) Now just push the terminal into a corner and you can carry on with other work, with your eyes having to glance at it once in awhile
(if you are unfamiliar with navigating or do not have python, feel free to ask in the comments. as always, google it first though.)
I know this is not ideal. I think it would be much more helpful if it could play sounds.
Perhaps someone can help me update it to play a sound when there is a vacancy, or to even automate the whole process. Else I will look into it the next time I am backing a project.
Wednesday, 25 March 2015
Thursday, 26 February 2015
Arduino Initiation Ceremony
My younger brother has to work with arudino for a school project. Over the weekend I went though the basic tutorials with him.
 |
| This pictured captured his "hello world" moment, blinking led. |
LED Cube - ini
Project Initialization: LED Cube (3by3)
So I decided to make a LEDCube.
A simple 3by3 one to begin with.
A simple 3by3 one to begin with.
 |
| (1) Didn't have a prototyping board so I compromised. Poked holes at what I hope is equal distances. |
 |
| (2) First row soldered. |
 |
| (3) All soldered. |
 |
| (4) This was definitely the hardest part. Soldering them one on top of the other. |
At this point I realized I did not have enough resistors. I had overestimated my supply. Anyway I have ordered a bunch of stuff from DX, awaiting the delivery now.
PiCade V1
So my PiCade project has been on hold for one whole sem now. I can't remember why. My club. Open Source Society, was invited to take part in CEC so all of us had to display a project. I thought it would be a good time to get this running.

I then proceeded to my TV lounge to test it, since my monitor does not have HDMI input. However the Pi could not turn on, due to it not having enough power. I came back to the room and plugged it in, it turned on fine and I could ssh in. Since I did not have any alternative power supply or monitor I tested it no more that night.


So I installed RetroPie again. I then soldered ( I had borrow my friend's kit, so I could do it in my room) all the wires to the buttons. The joystick I had done long back.
I went home the next day and tested it again, it switched on. Now this part is where I had the most trouble, getting the joystick to be recognized. I had to try a lot of drivers, none worked. In the end the first one I had installed, from Adafruit worked. Turned out I had just named a folder wrongly. That got it to be recognized by EmulationSation but to get Snes to recognize it I had to download a python script that ran in the background which made the GPIO inputs appear like a keyboard. I found it online, I will post an update soon with all links.
Next I went to work on the holding station. I found this box to be perfect as it had a display at the front, from which people would be able to see the internals.
It was a nice fit!
I decided to put the buttons in foam then fit the foam onto the box.
It was a nice and tight fit!
It was a nice and tight fit!
But damn sadly the foam broke for the last button. And cutting metal accurately was quite hard anyways...So
I created this little beauty! There is a small flap at the back for the wires to come out from.
The pi can be placed inside while being carried around and when on display/being used it can sit outside.
The pi can be placed inside while being carried around and when on display/being used it can sit outside.
Here is a short clip of it in action.
Some photos of the booth, including projects by other members of NTUOSS:
NTUOSS: https://www.facebook.com/ntuoss
PiCade 2.0
Will there be a PiCade 2.0? Yes definitely!
This time it will be powered by Pi2 and will be hosted in a proper cabinet for the entire system! I will probably do this in June or July.
Thursday, 8 January 2015
Ubuntu Love.
At the start of this semester, I had brought my old PC to my hostel and had installed Ubuntu on it. However the LAN was not working. I tried to solve the issue but I believe it was a hardware issue. I kept the PC aside and borrowed a Windows laptop from my friend to do my work on.
After my exams I took the spare laptop from my house, a 2012/2013 Asus X401A, and install Ubuntu on it. I have happily been using it ever since. Recently I got a little bored of the theme and decided to change the color of the bar as well as all the fonts. My desktop is as below.
I bought a Sony Z3 Compact two months back and so my Nexus 4 is just lying around. The N4 is now running the beautiful Lollipop and I can't wait for Z3C to be updated as well. So yesterday I got the idea of trying out Ubuntu Touch on my N4. Today I set out to do it but am encountering difficulty getting the phone detected. I will update my progress.
Tuesday, 4 November 2014
The Dragon Inscriber


Out group built a simple arm and tasked it to write Chinese characters. All the programming was done by the software we downloaded from the official website.
Due to the software, we were spared reverse kinematics calculations.
 |
| A short clip of it in motion. |
Monday, 27 October 2014
Some Updates...
 | ||
| Made a mistake with this. The stiffness of the wires are much more than that of the metal on the motor...it broke off later. |

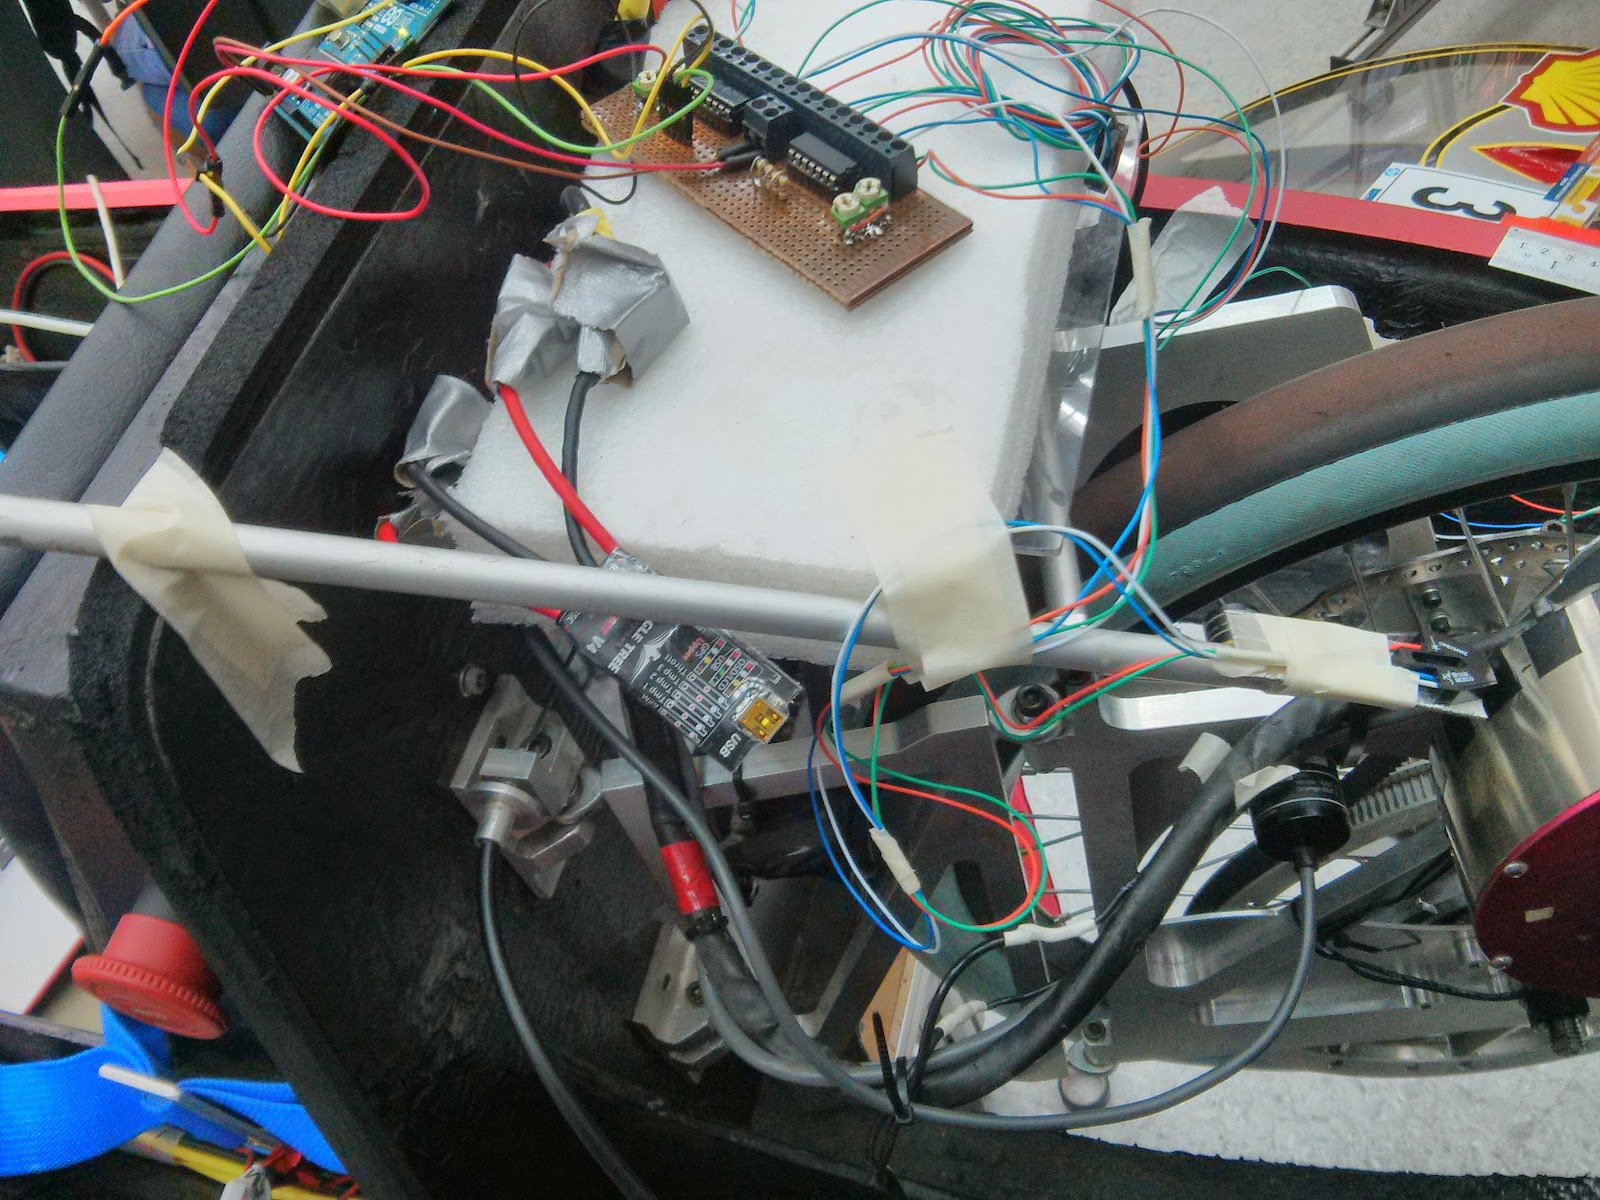
The motors and joystick have all been soldered. However I am currently too busy to work on them. Will try to wrap them up in December.
 |
| Tachometer check.... |
 |
| This was damaged...maybe during soldering. I re-soldered to try and realign everything. Searched online and realized I should have used the breadboard while soldering to align everything. |
 |
| Drew with a black marker initially but that did not work so had to use black tape everywhere. |
 |
| Tachometer #1 reading the diskbrake... |
 |
| #2 reading the motor. Used some scrap metal to hold it in place. |
Tested my tachometer code on the older car. The rpm seemed consistent for the motor but the wheel one was jumping wildly. Later I realized it was because the holes on the disk brake are very random.
Monday, 15 September 2014
Installing Ubuntu
Since last week my laptop has been on life support. My last chance of saving it might be a clean installation of the OS but I would have to back up all my files before I do that. Thus this week I brought my old house computer, which was in storage, to school. The monitor, keyboard and mouse were already here, for use with the RPi so I just had to bring in my CPU. Not wanting to use Windows as the OS I had burnt a Ubuntu 32bit installer on one of my flash drives using my house computer before hand.

For some reason there appeared to be a hidden drive that I was not aware of, running Windows XP. And it was twice the size of my main drive(80gb)!I was trying to remember if I had partitioned the computer before but could not remember doing so. And they appeared as two separate hard disks, not separate partitions. Ubuntu was prompting me to choose one to install over. I decided to investigate.

This was the culprit. A small hard disk that I had savaged from a netbook that someone had thrown away. I had forgotten that I had connected it to this computer. I decided to leave it there for now, might use it for an upcoming hack I have in mind.

Currently I am having some issues. Online lectures are not playing and lan connection is not detected. Right now I am resolving the video issue and using a wifi dongle. Will look into the other issue when time permits and hopefully get around to customizing the OS.
Monday, 8 September 2014
Shopping Spree
Went on a shopping spree the past few days as preparation for two projects.
First project will be based on arduino. I got inspired after reading about a ballbot, so I will be doing a simpler version, a two wheel balancing robot. I did not get any battery pack for the robot, hopefully can find something lying around else will have to go down to sim lim tower. As for the body of the robot I will try to use two plastic sheets. Will visit one or two labs and check out their waste materials.
Second one will be a raspberry pi arcade gaming machine. The parts for this were rather expensive. I found a gamepad made for PS1/PS2 on Carousell for cheap and wanted to try and use parts from it but the seller did not reply for a few days. Only after I ordered the joystick he replied. Will not be getting it although I was looking forward to opening it up. I will be using my old monitor as the screen as it even has built in speakers. However it only has VGA input hence I ordered a HDMI-VGA adaptor.
Sunday, 17 August 2014
Summary of Nao
 |
| A photo I took for the Graduation book (2014) |
While I was with Team Nanyang (Robocup) I got exposed to Ubuntu and Python, learnt how to use Terminal to run scripts and transfer files and also learnt how to use Choregraphe, a software made for the Nao Robot. While the team disassembled before we could work on the soccer aspect, we did put together a dance for EEE night.
Enjoy the video!
Durian Kong
Last semester I had a semester long project with 7 other randomly selected students. After much brainstorming we settled on an idea of Durian Opener.
My part in the project included using SolidWorks to come up with some parts of the device, lasing with the technicians as well as coming up with the poster. Initially the poster was supposed to be done by another group member but because she got into an accident I took over with 2 days left to the deadline. I'm quite proud of the posters as I had no prior knowledge of Photoshop and got it done in two days by using resources such as YouTube.
The device could not be manufactured in school due to it's complexity so we outsourced the manufacturing portion to China.
Here are some photos of the complete device and the poster as well.


The two posters and the product are currently on display in the engineering library at NTU!
My part in the project included using SolidWorks to come up with some parts of the device, lasing with the technicians as well as coming up with the poster. Initially the poster was supposed to be done by another group member but because she got into an accident I took over with 2 days left to the deadline. I'm quite proud of the posters as I had no prior knowledge of Photoshop and got it done in two days by using resources such as YouTube.
The device could not be manufactured in school due to it's complexity so we outsourced the manufacturing portion to China.
Here are some photos of the complete device and the poster as well.
 |
| Fruit of our labor! |
 |
| Before the test |
 |
| Successful test! |
The two posters and the product are currently on display in the engineering library at NTU!
Thursday, 14 August 2014
Tachometer Trouble

Someone passed me a Tachometer to test. So I got a code from the web and modified it to suit my needs. Then I wanted to test it but could not as the infrared sensors were not workings. I would go to the lab tomorrow and use the multimeter to find out where the problem lies.
I really wish to learn how to build the tachometer myself. I should also buy a screwdriver. Had to improvise by using cutting out a small piece of a can.
Monday, 21 July 2014
Post Hackathon
The Code Extreme Hackathon is over. Was a very good experience. The only problem was that I was very tired from reservist. Think I might have slept the most.
My group made an eBasket.
Got a chance to test most of the things I bought the other time. All work well.


My group made an eBasket.
Got a chance to test most of the things I bought the other time. All work well.
Sunday, 22 June 2014
Testing the voltage/current reader
Was trying to find a way to find out my Pi's IP address without connecting it to a monitor(failed for today) so I took out the current/voltage reader. The current shows only .3A so I'm not sure how accurate it is. Later I will plug my phone in and compare the values with an app on my phone. The voltage hovers slightly above 5v.


The color is slightly different. Have not tested any code yet.
Friday, 20 June 2014
Online Learning
I have started doing an online course at Udaciy called "Intro to Computer Science".
I took it as it said we will learn how to build our own search engine and social network site which I thought was quite cool. I am currently midway into lesson one and so far it is really really basic Python introduction.
I knew if I take it alone I would probably drop out halfway. So I roped up a couple of friends to do it with me. Let's see how many of us complete it.
I have created a forum for us to discuss our questions at. It is at the following url: http://kaho.freeforums.org/
Arrival of my Arduino Clone
Came home today to see my items had arrive! I will test them another day and upload the results.
 |
 |
| I can see not everything is aligned proper. |
 |
| The breadboards are much smaller than I anticipated. The bottom part has double-sided tape attached. |
Wednesday, 18 June 2014
The increasing power of the tablet
I finally started using my bluetooth keyboard and it really increases my productivity on the tablet, at least when working at my desk. I also tried using a mouse using my OTG adaptor but I think I prefer the touch input. I tried looking for games which had the option of using the keyboard as input but I was unable to find any.

I did find an Arduino IDE! It can not only compile the code but also send it to your Arduino using OTG! Unfortunately my Uno is at home so I could not test he last part but I did download the code and tested compiling on it.
 |
| This is the app name and publisher |
 |
| The app |
 |
| Can you spot the error(s)? |
 |
| The compiler sure did! |
 |
| There was also an option to purchase this. Basically it helps you "autocomplete", like ecplise. If I use this app for my arduino coding I might get it. |
So this basically means that I no longer have to lug my Mac around just for my Arduino. I can simply carry my NotePro now! =D
Subscribe to:
Posts (Atom)